
Every year for Thanksgiving we have the pleasure of gathering at my
Aunt Gaye and Uncle Joe’s home. She sets a lovely table and makes food
that is even lovelier. Before the evening is over, we draw names for
our Christmas Eve gift exchange. I’m usually in charge of writing the
names down and making sure that everyone selects a name. I also have to
make sure that everyone chooses the name of someone who isn’t in their
immediate family. Whew!
Last year my cousin Christopher and I had a brilliant (beyond
brilliant) idea…instead of writing down everyone’s name, why don’t we
just use the place cards? Dah! Why not? Why did it take us twenty
something years to figure that out? Instead of scrambling for paper and
a pen and scissors, why don’t we just use the cute place cards with
everyone’s name on them that are right in front of our eyes????
So we did. Christopher and I gathered up the place cards, put them in a bowl, and everyone selected their person.
Trouble is, though, that we neglected to have everyone turn in their
chosen place card when they were done. Some people tore them in half,
some people rolled them up, and some people used them as wrappers for
their chewed gum.
Oops.
My aunt was so upset. Turns out that what seemed like an
insignificant part of our Thanksgiving festivities (names on a piece of
paper) was actually something that caused my aunt a lot of angst. She
went to a lot of trouble to ensure that all of the cards matched, that
the font size was perfect, etc. When we gathered up the cards for our
name-pulling event, we gave no thought to the time and effort that she
put in to making sure the place cards were as perfect as everything else
that day.
(I call this story “Guilt by Association” because I put the blame on
Christopher and he put the blame on me…we had no idea how much we
would hurt her feelings, so neither of us wanted to take
responsibility. Shame on us!)
______________________
Needless to say, I have spent the last year searching and searching
for the perfect place cards to replace the ones that were ruined last
year. I have been determined to make amends.
Have you ever tried to find Thanksgiving place cards? It’s not an easy task.
My aunt’s birthday is next week (just a couple of weeks before
Thanksgiving) so I decided to make her new cards. I’m confident that
giving the gift of HANDMADE will make up for last year’s debacle and
erase the feelings of ungratefulness for her efforts that she thought we
had.
______________________
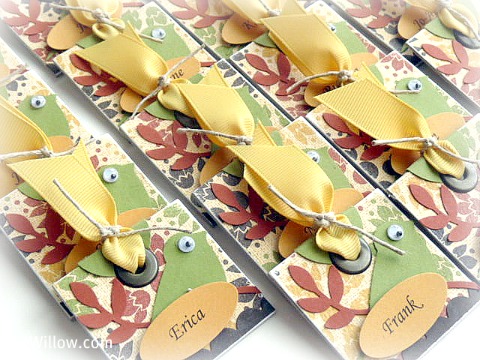
You can make these, too!!!! Even though there are a lot of steps and supplies involved, they are pretty easy to make.
All of the supplies I used are from Stampin’ Up!. For your convenience, I’ve listed the item numbers next to each supply.
If you would like to order any of the supplies to make the place cards yourself, click HERE and then click on the SHOP NOW tab in the upper right-hand corner of the page.
SUPPLIES:
Specialty Designer Series Paper: Autumn Spice (#120808)
Card Stock: Old Olive (#100702) Cajun Craze (#119684) Early Espresso (#119686) More Mustard (#100946)
Chipboard: Long Board On Board Sheets (#114320)
Punches: 1″ Circle Medium (#119868) Scallop
Edge Border (#119882) 1-3/8″ x 5/8″ Oval Large (#119863) Two-Step Bird
Extra-Large (#117191)
Ribbon: Daffodil Delight 5/8″ Grosgrain (#119761) Natural Hemp Twine (#100982)
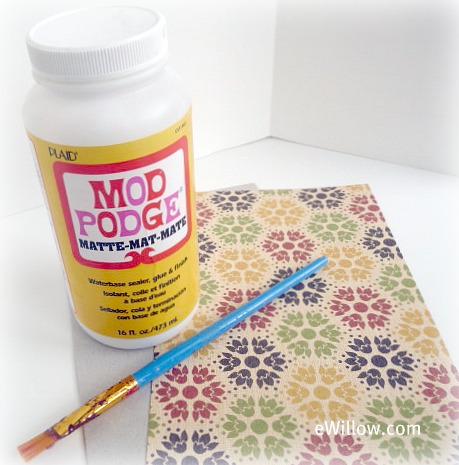
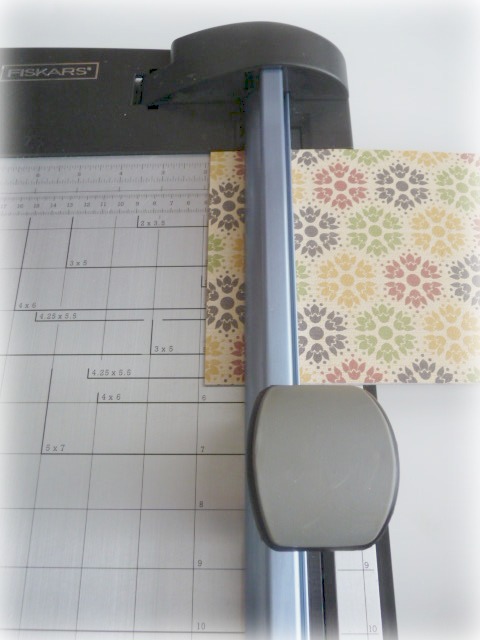
Tools: Crop-a-Dial (#108362) Rotary Paper Cutter (Fiskars) Sanding Blocks (#103301) Mod Podge Matte
Accessories: Antique Brass Jumbo Eyelets (#108431) Googly Eyes
_____________________________
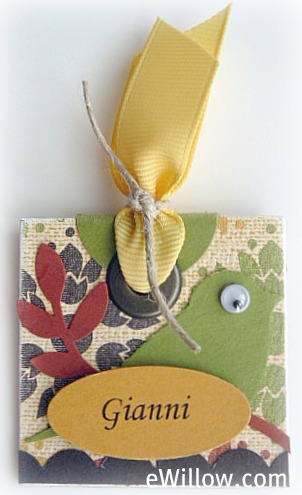
First, BEFORE you cut the squares for the place cards, adhere the decorative paper to the chipboard with Mod Podge:
Next, cut squares with the rotary cutter 1-7/8″ x 1-7/8″
3) Distress the sides of each place card with the sanding blocks
4) Punch and adhere a 1″ circle to the top of each square
5) Using the Crop-a-Dial, attach a jumbo eyelet to the center of each 1″ circle
6) Cut 1/2″ strips of Early Espresso card stock and punch an eyelet
border along each strip. Adhere eyelet border to the bottom of each
square, cutting the border to fit the length of the square.
7) Punch and adhere branches and birds to each square.
8) Cut a 5″ piece of Daffodil Delight ribbon for each square. Pull
the ribbon through the eyelet and tie with a 4″ piece of hemp twine.
9) Print out names onto More Mustard card stock. Use oval punch to punch out names. Adhere to each place card.